Whenever you sign up for internet access, the Internet Service Provider (ISP) also supplies the required network settings (including the Domain Name System (DNS) addresses), that you can use to load your favorite websites, access online services, and download files. However, their DNS servers tend to be slower, sometimes unreliable, and not very private. But you can use different resolvers from third-party companies to improve your internet experience on Windows 10. Here's how!
What's DNS?
A Domain Name System is a service that allows you to type a friendly domain name in the web browser to load a web page.
In this guide, we'll walk you through the steps to change the DNS settings on your device using Control Panel, Command Prompt, and Settings app.
- How to change DNS settings using Control Panel
- How to change DNS settings using Command Prompt
- How to change DNS settings using Settings
How to change DNS settings using Control Panel
To change the current DNS settings through the networking settings on the Control Panel, use these steps:
- Open Control Panel.
- Click on Network and Internet.
- Click on Network and Sharing Center.
- Click the Change adapter settings option in the left pane.

5 Right-click the network interface connected to the internet, and select the Properties option.
6. Select and check the Internet Protocol Version 4 (TCP/IPv4) option
7. Click the Properties button.
8. Click the Use the following DNS server addresses option
9. Type your "preferred" and "alternate" DNS addresses.
If you're using Google Public DNS, OpenDNS, or CloudFlare, you can use these settings:
- Google Public DNS: 8.8.8.8 and 8.8.4.4
- OpenDNS: 208.67.222.222 and 208.67.220.220
- Cloudflare: 1.1.1.1 and 1.0.0.1
Quick tip: If you need to use more than two DNS addresses, you can click the Advanced button, and on the DNS tab, you can add, edit, and remove as many resolvers as you want. You even have an option on the side to set their priority.
10. Click the OK button.11. Click the Close button.
How to change DNS settings using Command Prompt
If you don't have access to Control Panel, or you're more comfortable using commands, you can also use Command Prompt to change the DNS settings on Windows 10 with these steps:
- Open Start.
- Search for Command Prompt, right-click the top result, and select the Run as administrator option.
- Type the following command to change the networking settings and press Enter:
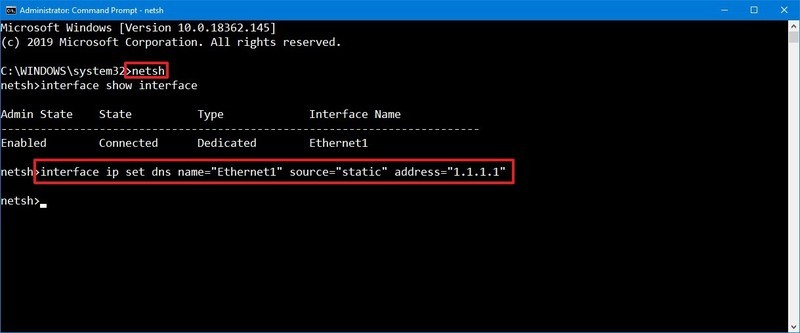
netsh - Type the following command to identify the names of the network adapters and press Enter:
interface show interface - Type the following command to set the primary DNS IP address and press Enter:
interface ip set dns name="ADAPTER-NAME" source="static" address="X.X.X.X"In the command, remember to change ADAPTER-NAME with the name of your network adapter you identified on step No. 4, and change X.X.X.X with the IP address of the DNS server that you want to use.
If you're using Google Public DNS, OpenDNS, or CloudFlare, you can use these settings:
- Google Public DNS: 8.8.8.8 and 8.8.4.4
- OpenDNS: 208.67.222.222 and 208.67.220.220
- Cloudflare: 1.1.1.1 and 1.0.0.1
6. Type the following command to add an alternative DNS IP address and press Enter :interface ip add dns name="ADAPTER-NAME" addr="X.X.X.X" index=2
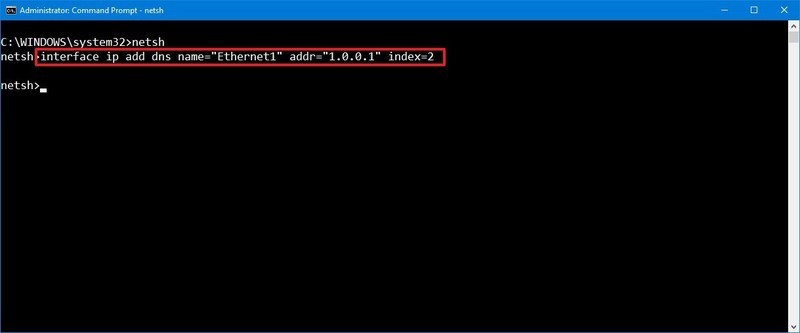
- In the command, remember to change ADAPTER-NAME with the name of your network adapter you queried on step No. 4, and change X.X.X.X with the secondary address that you want to use.
Quick tip: If you need to add even more DNS addresses, you can repeat the above step, but increase the number of the index option by 1. For instance, interfaceip add dns name="Ethernet1"After you complete the steps, Windows 10 will start using the new DNS server addresses to resolve domain names to numeric addresses that your device can understand.
addr="8.8.4.4" index=3
How to change DNS settings using Settings
To change the DNS settings using the Settings app on Windows 10, use these steps:
- Open Settings.
- Click on Network & Internet.
- Click on Ethernet (or Wi-Fi depending on your connection).
- Select the network connection.

5. Under the "IP settings" section, click the Edit button.
6. Use the "Edit IP settings" drop-down menu and select the Manual option.
7. Turn on the IPv4 toggle switch.
8. Type your "Preferred DNS" and "Alternate DNS" addresses.
If you're using Google Public DNS, OpenDNS, or CloudFlare, you can use these settings:
- Google Public DNS: 8.8.8.8 and 8.8.4.4
- OpenDNS: 208.67.222.222 and 208.67.220.220
- Cloudflare: 1.1.1.1 and 1.0.0.1
9. Click the Save button.
10. Restart your computer. - Once you complete the steps, the new DNS settings will take effect, and you should now be able to connect to the internet using the new resolvers.
- Google Public DNS: 8.8.8.8 and 8.8.4.4
- Open Settings.
- Google Public DNS: 8.8.8.8 and 8.8.4.4